
Vanilla Bean Gelato - Recipe

 This vanilla bean gelato recipe uses the science behind gelato production to produce exceptionally creamy gelato with an extremely smooth mouthfeel. The volatile flavour molecules in the vanilla extract give the gelato an immediate burst of flavour that is followed by the sweet, creamy, rich, full bodied, and somewhat woody, flavour of grade A (or ‘black’) Bourbon vanilla beans.
You might also like to read:
• Lello 4080 Musso Lussino Ice Cream Maker - A Comprehensive Review• Cuisinart ICE-100 Ice Cream Maker - A Comprehensive Review• Fibre in ice cream• The role of fat in ice cream• Why is corn syrup used in ice cream?
PREP TIME
About 10 minutes
HEATING TIME
30 minutes at 77°C (170°F)
EQUIPMENT
Food thermometerIce cubesZip-lock freezer bag
INGREDIENTS
CreamMilkSugarSkimmed milk powderInulinEgg yolks1 large grade A (or ‘black’) Bourbon vanilla bean.
Produces 800 ml (0.85 quarts) of gelato mix
PART 1: QUICK-READ RECIPE
- To start, enter the fat content of your cream in cell B2, and the fat content of your milk in cell B3 in the mix composition spreadsheet. Press enter to update the spreadsheet. Cells B6 to B11 (in green) display the amount of each ingredient, expressed in grams, that you'll be using for this recipe.
- Fill a large bowl with cubes of ice. Place a zip-lock bag next to the bowl ready for later.
- Run a sharp knife down the vanilla pod to separate it into two. Scrape out the sticky material containing the small black beans into a small bowl. Dice the two vanilla pod halves into small pieces or, preferably, grind in a coffee or spice grinder. Add to the bowl containing the sticky material and set aside for later.
- Before you combine your ingredients, weigh your pan and note down its weight.
- In your pan, combine the sugar and egg yolks. Add the cream, milk, skimmed milk powder, and inulin. Stir well.
- Over a medium heat, bring your mix up to 75°C (167°F) whilst constantly stirring; this usually takes me between 13 and 15 minutes.
- Once the temperature reaches 75°C (167°F), turn the heat down to low, move your pan about 1/4 of the way off the heat, and continue heating and stirring until the temperature slowly reaches 77°C (170°F), which should take another 2-3 minutes.
- Keep the mix at 77°C (170°F) for 30 minutes, stirring constantly and adjusting the position of your pan to help regulate the temperature. Don’t worry if you go slightly over 77°C (170°F); just try and keep the temperature as close to 77°C (170°F) as you can.
- After 30 minutes at 77°C (170°F), take the pan off the heat and weigh it. Subtract the weight of your pan, which you wrote down earlier, from the total weight displayed on your scales to get the weight of your mix post-heating. If your post-heating mix weight is greater than 871g, place the pan back on the heat and continue stirring until you get it to 871g.
- Once you get the mix weight down to 871g, add the blended vanilla powder/diced pieces and sticky material. Put the pan back onto the heat and, whilst stirring, keep the temperature above 72°C (162°F) for 15 seconds to pasteurise the vanilla pod.
- Carefully pour your mix into the zip lock bag that you placed next to your ice bath. Seal the bag and place it in your ice bath.
- Once your mix has cooled to 7.2°C (45°F), which should take no more than 1.5 hours, place the zip-lock bag in the fridge and leave it overnight. To improve the extraction efficiency of the beans, I'd recommend sloshing the mix around the bag every few hours. This will give your gelato a stronger vanilla flavour.
- The next day, carefully sieve your mix into a large bowl or jug using a clean wooden spoon to press down on the vanilla powder/pieces to extract as much of the flavour as possible. Add 2 teaspoons of vanilla extract to the mix and pour it into your ice cream or gelato freezer.
- When your gelato reaches between -10°C and -12°C (14°F and 10.4°F) (a cheap infra-red thermometer does the job nicely), quickly extract it from your machine and into a container. Place in the freezer to harden to a serving temperature of around -14°C (7°F), which should take 1 to 2 hours.
PART 2: LONG-READ RECIPE
[toc]
1. Mix composition spreadsheet
Don’t worry if the spreadsheet below looks confusing, I’m going to walk you through it step by step. You just need to pay attention to the cells in yellow, green, and blue.
Let's start with the fat content of your milk and cream. For gelato production, you can use any kind of cream (US: light, whipping, heavy; Australia: light, thickened, single, double; Canada: half and half, table, whipping; UK: singe, double) and milk as long as you know the fat content of both. Here in the UK, the fresh double cream I use contains 47.5g of fat per 100ml, which equates to 47.5% fat, and the whole milk 3.7g of fat per 100ml, or 3.7% fat.
To start, enter the fat content of your cream in cell B2, and the fat content of your milk in cell B3. Press enter to update the spreadsheet. Cells B6 to B11 (in green) display the amount of each ingredient, in grams, that you'll be using for this recipe.
That’s all that we need to do to the spreadsheet for now; we’ll come back to it later after the heating stage.
2. Inulin
Inulin is a dietary fiber found in a variety of plant foods such as bananas, barley, chicory, and onions. It's an ingredient that I've only just recently become extremely interested in not only because of its association with a wide range of health benefits, which include improved bowel habits ([^1]), increased calcium absorption with positive effects for bone health ([^2]), and a reduced risk of heart disease ([^3]), but also because it significantly improves texture; I've discussed the texture enhancement abilities of dietary fiber in my post on fiber in ice cream.
 3. Prepare an ice bath
The next step is to prepare an ice bath. An ice bath is a mixture of ice and water that you’ll use to cool your mix as quickly as possible to no more than 7.2°C (45°F) within a maximum of 1.5 hours. This minimises the time the mix spends in the ‘danger zone’, between 5°C (41°F) and 65°C (149°F), where bacteria likes to multiply.
Fill a fairly large bowl about 2/3 of the way with ice cubes and place a large zip-lock freezer bag next to the bowl ready for later.
4. Vanilla beans
I’ve tested Tahitian, Indian, Bourbon, and Ugandan vanilla beans, and have found that grade A (or ‘black’) Bourbon beans have the best flavour and aroma. Bourbon vanilla is the term used collectively for beans from Madagascar, Reunion, Comoro Islands, and the Seychelles. The aroma is sweet, creamy, rich, full bodied, tobacco-like, somewhat woody, deep balsamic, and has sweet spicy back notes ([^4]).
The only downside to grade A Bourbon beans is that they are ridiculously expensive. You can use lower grade B Bourbon, or Tahitian, Mexican, Indonesian, Indian, or Ugandan beans that are, generally, cheaper and will still give fairly decent results.
4.1. How to choose vanilla beans
When choosing vanilla beans, a high vanillin (>0.20%), high moisture (>20%) bean is the most likely to deliver the best quality flavour.
4.1.1. A high vanillin content
Vanillin is the most abundant of the vanilla flavour constituents, varying considerably from trace quantities to almost 3% by weight of cured vanilla beans, and is generally used as a prime indicator of flavour quality. The lower the vanillin content, the lower the quality of the bean, not just because of the vanillin itself, but also due to the other flavour notes that develop along with vanillin during curing.
4.1.2. A high moisture content
The moisture content of commercial vanilla beans varies from 10% for poor quality lower grade beans to 35% for gourmet beans ([^5]). Drier beans are less aromatic than high moisture beans and flavour notes, such as pruney, woody, floral, fruity, and rummy, which develop along with vanillin during curing, do not develop and/or are lost, in over-dried (low moisture) beans ([^6]).
4.1.3. Bean length
The length of the bean is also a good indicator of quality with Grade A beans usually measuring over 15 cm (5.9") in length.
4.2. Preparing your bean
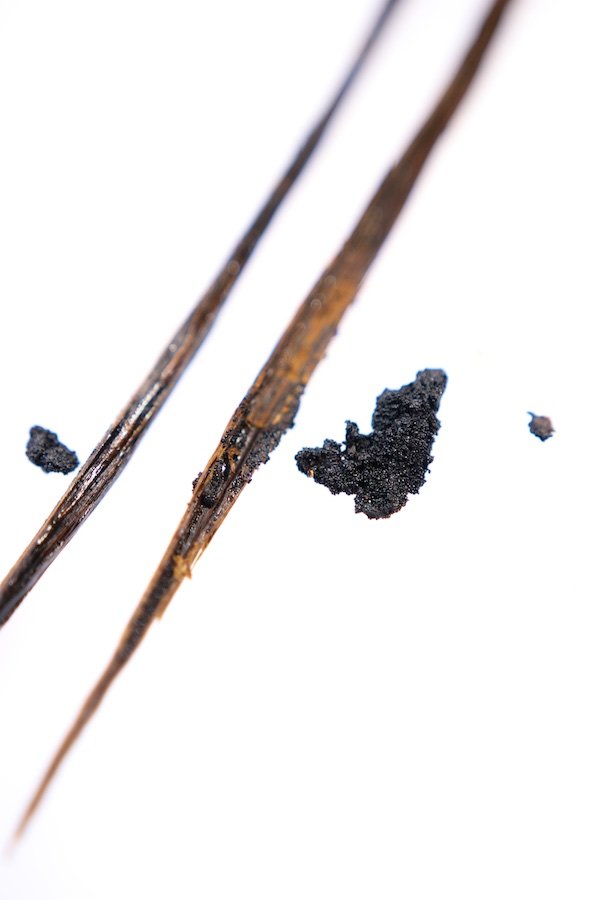
Vanilla’s flavour is contained in two different parts of the pod (commonly referred to as the bean): the sticky material that contains the small black beans, and the pod wall.
On a chopping board, run the tip of a sharp knife down the pod to separate it into two. Using the back of the knife, scrape out the sticky material into a small bowl.
If you have a coffee or spice grinder, grind the two halves of the pod into a fine powder. Studies has shown that vanillin yield increases with decreasing pod particle sizes: powdered pods have a higher vanillin yield than 2mm and 5mm chopped beans ([^7]). If you don’t have a coffee grinder, dice the two pod halves into small pieces; the smaller you can get them, the better.
Add your ground/diced pod halves to the same bowl containing the small sticky material and set aside for later.
 4.3. Why use vanilla extract?
Rob Linforth, Principal Research Fellow at the University of Nottingham’s Faculty of Science, notes that as we eat, what we register most intensely is the rate of change of flavour: that is, we perceive a quick, powerful burst of flavour more intensely than a slow, gradual build up of flavour ([^8]).
Flavour can be best defined as a combination of taste, aroma, texture, temperature, sight (and even sound) experienced by an individual when eating or drinking. Flavour results from two types of molecules: those that are volatile (i.e. small and light enough to evaporate from their source), which are responsible for aromas; and those that are non-volatile (i.e. don’t easily evaporate at room temperature), which are responsible for taste. It is generally believed that aroma is more important than taste in determining overall flavour, a generalisation that can be easily demonstrated by observing the difficulty in distinguishing between an apple and a pear if our nose is blocked by a cold or pinching fingers. Alcohol (vanilla extract is made up of alcohol, water, vanilla pods, and sometimes sugar), being volatile, releases aroma compounds relatively quickly, giving a quick burst of vanilla aroma as soon as it is eaten.
5. Heating the mix
Before you combine your ingredients, weigh your pan and write down its weight. You’ll use this measurement later at the end of the heating stage.
Add the sugar to your pan, followed by the egg yolks. Using a spatula or wooden spoon, mix these two ingredients well. The dissolved sugar will help prevent the yolks from curdling. Add the cream, milk, skim milk powder, and inulin and stir well.
For the next step, you'll need a food thermometer and a timer.
Over a medium heat, bring your mix up to 75°C (167°F) whilst constantly stirring (this step usually takes me between 13 and 15 minutes). Once the temperature reaches 75°C (167°F), turn the heat down to low, move your pan about 1/4 of the way off the heat, and continue heating and stirring until the temperature slowly reaches 77°C (170°F), which should take another 2-3 minutes.
Whilst stirring, keep the mix at 77°C (170°F) for 30 minutes, adjusting the position of your pan to help regulate the temperature. Don’t worry if you go slightly over 77°C (170°F); just try and keep the temperature as close to 77°C (170°F) as you can.
5.1. Why heat the mix to 77°C (170°F) for 30 minutes?
I know that keeping the mix at 77°C (170°F) for 30 minutes is quite cumbersome, but it’s essential for two reasons: 1. to pasteurise the mix, and 2. to significantly enhance smoothness of texture by promoting reversible protein denaturation.
5.1.1. To pasteurise the mix
Ice cream needs to be pasteurised to destroy all pathogens and the enzyme phosphatase that may be harmful to health. Pasteurised ice cream can be obtained by the mixture being heated:
- to a temperature of not less than 65.6°C (150.1°F) and retained at that temperature for not less than 30 minutes;
- to a temperature of not less than 71.1°C (160°F) and retained at that temperature for not less than 10 minutes; or
- to a temperature of not less than 79.4°C (174.9°F) and retained at that temperature for not less than 15 seconds ([^9]).
5.1.2. To promote reversible protein denaturation
Milk proteins are classified in two major categories. The first and most abundant is the casein family, and the second the whey proteins. When milk proteins are subjected to heat treatment, the whey proteins may undergo structural changes, commonly known as denaturation. Protein denaturation involves 2 steps: an unfolding step at 70 to 78°C (158 to 172°F), and an aggregation step at 78 to 82.5°C (172 to 180°F), that mostly follows unfolding ([^10]).
Heating milk so that the whey proteins undergo partial protein unfolding yields a more voluminous and more stable foam, improves the emulsifying characteristics of the proteins, imparts beneficial body and smoothness of texture, increases the meltdown time of the ice cream, and contributes to reduced iciness ([^11] [^12] [^13] [^14]). Foaming and emulsifying characteristics, however, may be impaired if protein undergoes aggregation ([^15]). Studies have shown a greater degree of protein denaturation with longer heating times ([^10] [^16]).
6. Mix weight after heating
After 30 minutes at 77°C (170°F), the next step is to weigh your mix. This step is a bit cumbersome but I'll go through it step-by-step with an example.
Here we go.
After 30 minutes at 77°C (170°F), take your pan off the heat and place it on a set of digital scales. Subtract the weight of your pan, which you wrote down earlier, from the weight displayed on the scales and write this post-heating mix weight down on sheet of paper; you'll need this figure to update the mix composition spreadsheet later.
If your post-heating mix weight is greater than 871g, place the pan back on the heat and continue stirring until you get a post-heating mix weight of 871g; don’t worry if the temperature doesn’t rise back up to 77°C (170°F) during this extra heating time. If your post-heating mix weight is considerably lower than 871g (below around 771g) after 30 minutes, you can still go ahead and freeze your in your ice cream or gelato machine, but it will likely be too sweet.
After 30 minutes at 77°C (170°F), I take my pan off the heat and weigh it on my digital scales. The scales display a total weight of 1950g. I know that my pan weighs 1060g (I weighed the empty pan before I added all the ingredients) so I subtract 1060g (the weight of my pan) from 1950g (the weight of the pan and post-heating mix), which gives me 890g. I know that my target post-heating mix weight (cell E5) should be 871g so I will put the pan back on the heat and continue heating and stirring for another 2 - 3 minutes. After 3 more minutes, I take my pan back off the heat and weigh it again. This time the scales display 1931g. I subtract 1060g (the weight of my pan) from 1931g (the weight of the pan and post-heating mix), which gives me 871g.
7. Cooling the mix
Once you get your post-heating mix weight down to 871g, add the blended vanilla powder/diced pieces and sticky material and put the pan back onto the heat. Whilst stirring, keep the temperature above 72°C (162°F) for 15 seconds to pasteurise the vanilla pod.
Switch the heat off and carefully pour your mix into the zip lock bag that you placed next to your ice bath, making sure that you scrape out as much of the vanilla powder/pieces as possible. Seal the bag and place it in your ice bath, which should, by now, contain a little melted water. If it doesn't, add just a little bit of tap water.
Once your mix has cooled to 7.2°C (45°F), which should take no more than 1.5 hours, place the zip-lock bag in the fridge and leave it overnight. To improve the extraction efficiency of the beans, I'd recommend sloshing the mix around the bag every few hours. This will give your gelato a stronger vanilla flavour.
8. Freezing your mix in your ice cream or gelato machine
The next day, carefully sieve the mix into a large bowl or jug, using a clean wooden spoon to press down on the vanilla powder/pieces to extract as much of the flavour as possible. Add 2 teaspoons of vanilla extract and pour your mix into your ice cream or gelato machine. I’d recommend reading my review of either the Lello 5030 Musso Pola, or the Cuisinart ICE-100, where I discuss the key principles of the freezing stage.
8.1. How do I know when the gelato is ready?
Draw temperature (the temperature at which gelato is extracted from the machine) significantly influences texture, with lower draw temperatures producing smoother texture. In my tests, I’ve found that gelato extracted at between -10°C and -12°C (14°F and 10.4°F) is perceived smoother and creamier than that extracted at conventional draw temperatures of around -6°C (21.2°F). I'd recommend getting a cheap infra-red thermometer to read the draw temperature.
Quickly scoop your gelato into a pre-chilled container and place it in the freezer to harden. It will take between 1 and 2 hours to get your gelato to a serving temperature of around -14°C (7°F).
9. Mix composition spreadsheet adjustment
When I make this recipe, my mix weight usually decreases from a pre-heating mix weight of 1050g (cell E4) to a post-heating mix weight of 871g (cell E5), a result of the reduction of water through evaporation. It’s unlikely, however, that you’ll get exactly the same post-heating mix weight as I do because of a host of factors, including the size of your pan, rate of stirring, and room temperature, that affect the rate of evaporation.
If you don't achieve a post-heating mix weight of 871g after 30 minutes of heating, I'd strongly recommend adjusting my Excel mix composition spreadsheet so that the next time you make this recipe, you'll end up with the correct mix composition after exactly 30 minutes of heating.To start, download the spreadsheet by clicking on the 'download' icon that's four icons in from the right of the black bar under the spreadsheet; you won't be able to save any changes you make to without downloading the spreadsheet. Enter your post-heating mix weight, which you wrote down earlier, in cell E5. Changing the post-heating mix weight will alter the mix composition so you will also need to adjust the data in cells B4, B5, E1, E2, and E3, so that the data in row 13 (in blue) is as follows:
• Total solids (cell A13): 46%• NFMS (cell B13): 12%• Fat (cell D13): 8%• Sugar (cell E13): 17%• Egg (cell F13): 4%• Inulin (cell G13): 5%
The spreadsheet will then update the weight of each ingredient in cells B8 to B11. The cream (cell B2) and milk (cell B3) fat content will be set to my default when you download the spreadsheet so make sure that you also update these to your cream and milk fat contents. Save the changes you make to the spreadsheet.The downloaded mix composition spreadsheet will then be good to go the next time you make this recipe.
10. References
[^1]: Marteau, P., Jacobs, H., Cazaubiel, M., Signoret, C., Prevel, J. M., and Housez, B., 2011. Effects of chicory inulin in constipated elderly people: a double-blind controlled trial. International Journal of Food Sciences and Nutrition. 62.164-170.
[^2]: Meyer, D., and Stasse-Wolthuis, M., 2006. Inulin and bone health. Current Topics in Nutraceutical Research. 4. 211-226.
[^3]: Brighenti, F., 2007. Dietary fructans and serum triacylglycerols: a meta-analysis of randomized controlled trials. Journal of Nutrition. 11.2552-2556.
[^4]: Ranadive, A. S. Quality Control of Vanilla Beans and Extracts. In: Havkin-Frenkel, D., and Belanger, F. C. ed. 2011. Handbook of Vanilla Science and Technology. Blackwell Publishing Ltd.
[^5]: Ranadive, A. S. Quality Control of Vanilla Beans and Extracts. In: Havkin-Frenkel, D., and Belanger, F. C. ed. 2011. Handbook of Vanilla Science and Technology. Blackwell Publishing Ltd.
[^6]: Gillette, M., and Hoffman, P., 2000. Vanilla extract. In: Francis, F.J. ed. 2000. Encyclopedia of Food Science and Technology. 2nd Edn. John Wiley & Sons, New York, pp. 2383–2399.[^7]: Dong, Z., Gu, F., Xu, F., and Wang, Q., 2014. Comparison of four kinds of extraction techniques and kinetics of microwave-assisted extraction of vanillin from Vanilla planifolia Andrews. Food Chemistry. 149. 54-61.[^8]: Linforth, R. The Impact of a Droplet of Flavour. In: Blumenthal, H. (ed). 2009. The Fat Duck Cookbook. Bloomsbury.[^9]: Dairy Products (Hygiene) Regulations 1995, Schedule 6, part v 1 (a).[^10]: Sava, N., Van der Plancken, V, Claeys, W., Hendrickx, M., 2005. The Kinetics of Heat-Induced Structural Changes of B-Lactoglobulin. J. Dairy. Sci. 88:1646-1653.
[^11]: Schmidt, K., Lundy, A., Reynolds, J., and Yee, L. N., 1993. Carbohydrate or protein based fat mimicker effects on ice milk properties. Journal of Food Science. 58(761–763):779.
[^12]: Alvarez, V. B., Wolters, C. L., Vodovotz, Y., and Ji, T., 2005. Physical properties of ice cream containing milk protein concentrates. Journal of Dairy Science. 88:862–871.[^13]: Patel, M. R., Baer, R. J., Acharya, M. R., 2006. Increasing the protein content of ice cream. Journal of Dairy Science. 89:1400–1406.[^14]: Goff, H. D., 2008. 65 Years of ice cream science. International Dairy Journal. 18(7).[^15]: Phillips, L. G., Schulman, W. and Kinsella, J. E., 1990. pH and heat treatment effects on foaming of whey protein isolate. Journal of Food Science. 55:1116–1119.[^16]: McKenna, B. M., and O’Sullivan, A. C., 1971. Whey protein denaturation in concentrated skimmilks. Journal of Dairy Science. 54.1075-1077.